
______________________________________________________________
Library Creator: Michael
Angel, www.CDSoundmaster.com
Manual Index
Installation
The Programs
About The Warm Tube Buss Compressor
Installation
Download,
Unzip.
Be sure to choose the correct 32 bit and/or 64 bit folder(s) when installing.
Open the WTBC in your DAW and this will generate you SER file, located in the same folder
where you installed your WTBC.
Email this SER file to CDSoundMaster and we will send your AUT file.
Paste this AUT file in the same folder as your SER and reload the WTBC.
Re-Open the WTBC and you are ready to go!
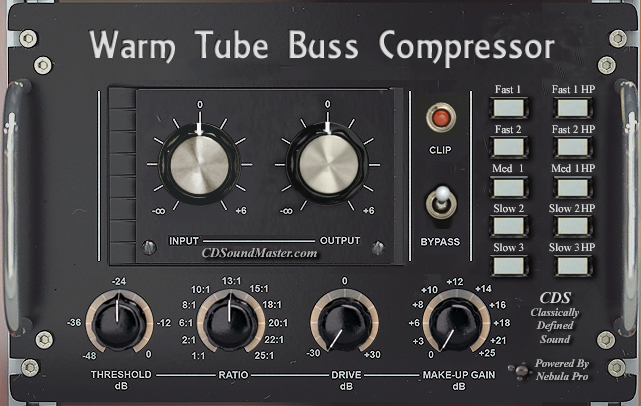
The Warm Tube Buss Compressor
The Attack and Release settings are fixed, and are controlled by clicking on any one of the Ten Timing Buttons
found on the right side of the plug-in.
From top to bottom, these Button selections each load individual programs, each carefully edited to provide
a wide dynamic range that controls the response of timing, depth (threshold), and amount (ratio) of compression.
Fast 1 is the quickest Buss response.
Fast 2 is a slightly longer response.
Med 1 is an average length response and is a good starting point if you are unsure of the sound
you are looking to use to shape your sound.
Slow 2 is a longer-than-Medium response time and is excellent for fine tuning complex material
with a longer average response time.
Slow 3 is the slowest response time.
The left column of Control buttons provides a straight forward response as I have designed this compressor
to react to the signal. Use this for the most overt and colored compression. This is also useful
if trying to give a lot of attack and impact to individual tracks at more extreme settings.
The right column uses an internal high pass filter that is fine-tuned specific to each program
to provide you with an incredible amount of control over the detail and signal-shaping character
of your program material, particularly in smoother controls of the signal. This will be further discussed
in the next section.
The WTBC has been custom-designed by CDS for ideal use as a Buss Compressor. This means that it is ideal for tasks that deal with the blending
together of program material. It can be used for any compression task, including
individual tracks, but it has been created to handle the challenging tasks of
buss groups, whether they are sub-sections of a full mix or representing the entire mix itself.
Using the WTBC
The Warm Tube Buss Compressor has been specially designed for use as a buss compressor.
It can be used for other compression tasks, but it handles the challenging process for blending music
elements together in a cohesive and unified sound.
Each setting has a very unique, independent timing response that I have carefully edited
to make it easy and defined as a useful tool for different music styles and recordings.
Simply click the Control Button that sounds right for your music, dial in the best sounding amount
of Threshold and Ratio, adjust the drive to taste (center point recommended) and enjoy the results!
The left column of programs range from Fast to Slow, from top to bottom respectively.
Use your choice of programs from the left buttons for the most colored compression response, represented by
a more overt response. Since the compression response is based around the entire signal, the longer waveform
of lower Frequencies are factored into the response time for all shorter Frequencies at once.
This can be an intentional and pleasant response for buss compression, where the overall timing elements
of the music can be locked together in place by accentuating the meter and tempo linked to the
sonic patterns represented in the wavelength of the waveforms. This is especially true in that the longer
the Frequency, the more it influences changes in response time. When this is linked to the choices you make
with how deep you control compression regarding the dynamic range (threshold) or to what extent you wish
to affect the signal (ratio), the timing elements are increasingly audible.
The list of Button Controls on the right side are designated with "HP" which stands for an internal
High Pass filter that is placed on the program material. The control to the right corresponds to the
control on the left, with the added High Pass filter applied.
At reduced threshold and ratio levels, these HP programs are the cleanest and most transparent
processes. As threshold and ratio are increased, the response tends to continue to be more transparent
compared to non-HP programs, but response arranges itself in a smoother and more controllable, tailored manner.
The "Drive" Control allows you independent adjustment of the harmonic distortion of the device.
Use the drive function to add or subtract the saturation character of the compressor.
It is recommended to leave the drive setting alone. If your signal is very low or you have used an
extreme amount of compression, you may enjoy increasing the drive, but careful not to increase it
a large amount on loud material. If you want to create a mix or master buss with a cleaner signal,
you can decrease the drive to place fewer harmonics on top of the original signal.
The Make-Up Gain control allows you to easily restore the overall volume level that may be
reduced by the amount of compression applied to the signal.
The Threshold control defines how many decibels will be affected by the depth of the signal being
compressed. This means that at 0dB, the threshold will not be compressing the signal beneath any
volume less than 0dB, essentially turning off the definitive timing element of the compression signal.
In reality, the timing is not fully unchanged unless the ratio is also set to its lowest ratio.
Use the depth of threshold as it relates to the ratio control. The more ratio and threshold amounts that are
used together, the more extreme the potential compression response will result.
When you are working with a selection of tracks that are close to a finished mix, you want the buss
compression to help unify the sound of these tracks, bringing them together. Typically, you don't want to harm
the transients or overdo the response so that it sound unnatural, which is obvious to most users.
But there is often a lot of confusion about what the best settings are.
I recommend looking at the decision of how to compress based on four operations, or factors:
1. What is the timing that represents the music the best?
2. Does it sound close to the final result?
3. Does it sound like it would generally benefit the most from compressing the peaks the most,
or the depth of the entire musical composition?
4. Do you want to hear the creative results of your compression decision as an intentional musical
element of the recording, or do you want to control certain elements and bring them together while
hearing only the music?
By considering these four factors for your buss compression, you can shape your decision about
setting controls accordingly. For instance, to consider the first factor, you want to select an attack
and release that are going to fit the musical material. Some people look at this in a purely utilitarian
perspective, deciding if a certain response speed will catch a certain formula of peaks or average response.
But, when considering a collective of parts being joined together, you not only want the rate of response to
reflect your technical goals, but you want it to line up with the musical expression. If you need a strong
reaction from the compressor and you do not want a ton of information to slip by, then lean towards a faster
response. If you want to cover the overall recording over time, with less emphasis on clamping down hard on
peaks that are out of control, then you may want a medium to slow response. Maybe you are unsure of this decision,
in which case you can audition a selection of the song with heavy compression, switching the timing elements to
see which one fits best just by listening; often the best option!
To look more into this detail, lets move on to examining the purpose of factor #2.
If your recording is coming close to the final result, and what you are compressing on the buss is supposed to
represent the music near completion, then ask yourself how close it is to sounding complete. This may sound
obvious to you, but answering this question to yourself may be more important than any other guiding decision
in the matter. If it is a long way from ready, make sure that you have addressed what you need to regarding the
equalization and panning and any other mix elements that need to be resolved before you deal with the final stage
of compression. Be sure that if any of these elements still come into play, that they will fit your
concept of the sound by adding them after compression, otherwise you may harm the sound you wish to achieve.
Once you are certain that your buss group or main mix is ready for compression, and you have brought your levels
as close to their end result as you can, and you have eq'd and panned everything in place, consider honestly
whether it sounds close to the polished mix or if it sounds a way off still. This may help you decide whether to
use a heavier dose of compression or to adjust your technique. In some cases, you may want to listen with a
deep threshold and high ratio and adjust the mix levels of individually bussed tracks, essentially mixing to the
compressor, and then once it sounds close to the final blend, back off of the compression amount until it sounds
polished. If it is very close to complete, then you know that you will want to use only as much, and the type,
of compression, that accentuates what you are already getting correct, helping it the rest of the way.
This stage of decision-making should be where you assess how you interpret the controls that you set for factor #3.
With the third factor, consider whether the buss mix at it stands has a lot of out-of-control peaks, meaning that they
either leap out above the average blend of music, or perhaps some peaks are managed and others are much louder.
Consider whether the overall mix has decent levels and a good dynamic range, but the quiet elements are far too quiet
and may need to be brought up, or whether you generally just need a certain range of the music to come together more.
The goal with this step is to address the range of volume that you are dealing with. There are even ways to address this
with techniques that involve working with different ranges of volume that are acceptable practice and even beneficial under
certain circumstances, including parallel compression, two-stage compression, and mixing several instances of compression
in parallel. I will very briefly cover this concept, at this stage only suggesting that WTBC is an excellent compressor
for making all of these decisions.
This is an important concept in compression that many people do not understand, so I will cover it briefly.
The depth of compression is primarily covered by the threshold. This means that the threshold determines what
decibel level is represented when the compressor activates. If you technically had threshold set to -1dB, then
the compressor would only compress when the volume of your mix got as loud as -1dB, which is likely not to happen very
often. -20dB would be likely to compress most of the music all the time, and even deeper levels can control even
the quietest settings. Something that is often overlooked is that the more elements that are factored in, the
more it can change the timing element as it occurs, meaning that if you were barely touching peaks, the compressor's
response will be pretty consistent in its response, as it is only opening and closing its reaction when a peak happens.
If you use a very deep threshold, then literally everything from a sustaining instrument to a reverberation become
a part of the decision making of the compressor in timing and ratio, so this is not only a linear decision about
the volume, but how the music will affect the character of the device.
When working with the ratio, you are deciding how much you want to compress the signal that you have designated.
Where the threshold decides how deep into the volume of the buss you want to activate compression, the ratio is the
definition of how hard you compress. Again, the higher the ratio, and the deeper the threshold, the more you will have
an adjustment of character and obvious compression artifacts, so choose this interaction between depth and amount to taste.
Finally, consider whether you want the result of your compression to be an obvious, audible treatment to the sound,
making a musical statement just like you are making with the song, or do you want to control the elements of the buss
without hearing the compression effect, or only a little of it? This can shape your decision on timing, threshold, ratio,
and type of compression, but it is most specifically going to define whether you wish to use the regular or HP version
of the timing element chosen. For HP, you are typically able to get more control over your music with less compression
artifacts, which is a good thing when needed, and in some cases may sound musically less interesting. As a personal note,
I like to use the HP when I want to get more control over more elements in a blend of tracks without harming what is already
there. In a similar way that I love using Tape Booster Plus to increase the overall volume of a mix without hurting the
transients or really changing the musical character, the HP can operate with compressing the signal much in this manner.
Essentially, you may find it easier to make the mix sound bigger, or louder, with less harmful side effects, using the HP.
However, if you need to control the deep low Frequency timing just as much as the rest of the mix, then use the regular
setting and use threshold and ratio that only affects the timing elements you want to hear. Listen for the
ideal combination of depth and amount to lock down on the rhythm and movement of the song to get just the right
compressing element. This makes it wonderful for controlling what reaches the final limiter or final eq in the chain
for mastering.
Just a quick note on parallel compression and dual-stage compression:
I want to bring these up because the WTBC is excellent for use in these techniques. They can both
play an important role in shaping your buss mixes, and different producers, mix engineers, and even
studios have been famous over the years for using different variations of these techniques.
Generally speaking, parallel compression will use two stereo buss groups.
Both buss groups will have the WTBC engaged.
For the first buss group, you will focus on one aspect of compression that you wish to
enable for the buss group. The second buss group will use a different setting that handles a different aspect of the mix.
You can even use parallel compression for several tracks in parallel.
My advice is to use two or more of the same compressor when doing parallel compression.
If you want any of it mixed with the original signal when using the WTBC, I recommend still
running the 'clean' signal through an instance of the WTBC with one of the buttons engaged and
an extremely low level of threshold and ratio.
The goal with parallel compression is to blend together the results of several aspects of compression
side by side, using different accentuations to bring out several musical elements in the mix.
For instance, you may want to use a deep, heavy compression on the whole mix, add it to
a smooth compression track that is just barely touching the peaks, and a third track where you
use moderate, pleasant compression. Adding these elements together can give a sense that you are
always hearing the average level of the sound, the peaks are under control, and there is a pleasant
range of dynamics still in place.
With a dual stage, you will want to research the actual process on your own and develop a technique
that works for your style of music, but the general concept for dual-stage compression is to address
different portions of a song or different scenarios that take place over the length of a song that need
to be addressed in a different manner. A classic example for this scenario is a verse-chorus transition.
Lets say that the verse is like a ballad and a little lighter and dynamic, and then the chorus kicks in
with extra instrumentation, and it tends to be louder. You may want to make the verse a little more pronounced
but not as heavy on compression as the chorus. When the chorus kicks in you may want a heavy, edgy, very well
contoured compression which would otherwise sound fake and disorganized on the ballad-like verse, but a
heavy-handed deep compression may over-compress the louder chorus. What can you do?
With dual stage compression, you are compressing one section of dynamic balance to taste, then feeding this compressed signal along with the clean uncompressed signal to a second instance of your WTBC, which will control the levels of both buss instances at once. The result is a well-balanced, controlled compression that is appropriate for both the verse and the chorus. This can be altered and used for multiple different variations of the technique, but it is a concept worth mentioning because, like parallel compression, the WTBC is an excellent tool for such tasks.
About the Warm Tube Buss Compressor
The controls are intentionally simplified to focus on a very specific range of controls and capabilities.
There are not a lot of things that this compressor won't do well, but it is designed to have a recognizable
personality and to give you a unique, special sound in producing your music.
This goes hand in hand with the compressors that CDS is offering, from the VTM-M2 which operates as a mastering-grade
tape machine that compresses and limits the signal like tape handles the signal, to the VTMC-M2 which is designed
to operate as a classic mastering tube compressor, items like the WTBC and others that follow are designed to
complement each other beautifully.
The WTBC is an original design, based upon my experience working with a wide range of favorite tube devices
and compressors of many eras and personalities. The tube element is based around great sounding tube devices.
and the harmonics and interaction with different dynamic settings come from real tube compressor signal chains.
I have made intentional and careful alterations to how the spectrum Frequency range is affected by the harmonics
so that you get a complex and musical blend of compressing and controlling of Frequencies, accentuated by the
natural tube harmonics. The combination is unlike anything that you have heard before, but is a reminder of the
best characteristics in compression and tubes.
I truly hope that you enjoy using the WTBC.
Thanks and God Bless You.
Sincerely,
Michael Angel
CDSoundMaster.com