
"N-TEN-AT4 VST": Michael Angel, www.CDSoundmaster.com
"Powered By Nebula" Acqua Technology: Acustica Audio, www.Acustica-Audio.com
Graphics: GravityLinks
Manual Index
Installation
Specifications
Using N-TEN-AT-4 VST
About The Technology
Installation
 WINDOWS INSTALLATION
Special Instructions for anyone using late Vista versions and Windows 7 users: log on to your computer as administrator.
When installing your N-TEN-AT4, regardless if it is the 32 bit or 64 bit version, right click ‘run as administrator’ to install. Make SURE that your audio programs are all closed when installing. When you open your DAW the first time after install, right click ‘run as administrator’ to open your DAW. Make sure that you choose the installation path that is suited to your vstplugins directory.
If using a x64 system, most likely you have two installation paths to choose from: 1. Program Files (x86)/Steinberg/vstplugins for 32 bit plug-ins 2. Program Files/Steinberg/vstplugins for 64 bit files
Make sure that you know if you have 32 bit and 64 bit plug-in directories. If you are running a 32 bit OS and all 32 bit host programs, then you should only have one plug-in directory, Program files/Steinberg/vstplugins. You can name your own location and use whatever location your DAW allows for, just make sure that it matches what your program says for the proper file type.
Before installation, be sure to close all other applications, as they can conflict with the installation process. It is recommended to run a system back-up or system restore point before installing any new software.
To install "N-TEN-AT4", first unzip the folder where the installation program resides. You will choose the location for your VST Plug-Ins. This is usually something like "C:\Program Files\Steinberg\Vstplugins" but you are able to choose the location when installing.
Once installed, your DAW or audio editing program will recognize 6 new plug-ins associated with this suite.
When you first load your first instance of "N-TEN-AT4 Channel Strip Suite", it will automatically generate a serial file for you. You only need to authorize your "N-TEN-AT4" programs one time. The Plug-Ins will not run until you complete the authorization process.
Go to your Vstplugins folder where you installed "N-TEN-AT4". You will see a subfolder called "CDSoundMaster". Usually, the path will be "C:\Program Files\Steinberg\Vstplugins\CDSoundMaster".
Within this folder you will see a file labelled "N-TEN-AT4.SER". This is your unique serial file that has been generated. Email this serial file to Michael@CDSoundMaster.com
We will email your authorization file. Place this "aut" file in the same folder as your "ser" file and reload the Plug-Ins(s).
MAC INSTALLATIONIMPORTANT! N-TEN-AT4 is now available for MAC VST. It can also be used as an Audio Units, AU, Plug-In via the VSTAU-Manager included on the website: http://monumentalaudio.com/ACQUA/MAC/VSTAU_Manager-0.2rc2.app.zip
MAC VST Installation:CDSoundMaster “N-TEN-AT4” Mac VST Installation Guide
Before installation, be sure to close all other applications, as they can conflict with the installation process.
Before installing your first CDSoundMaster Acqua VST Plug-In for your Mac, you MUST download and install the “Acqua_Host_Installer”, available on our website:
Extract contents to the following location:
(Primary HDD)Macintosh HD> Library> Frameworks>
You only need to download and place this Acqua Host Installer this one time for your Mac CDSoundMaster Acqua VST Plug-Ins.
To install “N-TEN-AT4”, first download and unzip the folder. Copy/Paste the CDSoundMaster-N-TEN-AT4 Folder to the following location:
HD>Library>Audio>Plug-Ins>VST> So that it looks like this:
HD>Library>Audio>Plug-Ins>VST>CDSoundMaster-N-TEN-AT4
Once pasted, they should automatically recognize in your VST-Compatible DAW or audio editing program when it loads. The new “N-TEN-AT4” series of plug-ins will now appear in your VST Plug-Ins list within your favorite audio program. But wait, we’re not done yet! When you first load any instance of the “N-TEN-AT4”, it will automatically generate a serial file for you. You only need to authorize your “N-TEN-AT4” program one time for the entire plug-in collection. The plug-Ins will not run until you complete the authorization process.
Go to your “CDSoundMaster-N-TEN-AT4” folder. Within this folder you will see a file labeled “N-TEN-AT4.SER”. This is your unique serial file that has been generated. Email this serial file to Michael@CDSoundMaster.com We will send your authorization file. Place this “N-TEN-AT4.AUT” file in the same folder as your “SER” file and reload the plug-Ins(s). Now they are authorized and ready to work for you!
MAC Audio Units Installation:CDSoundMaster “N-TEN-AT4” Mac VST Installation Guide
Before installation, be sure to close all other applications, as they can conflict with the installation process.
If this is your first CDSoundMaster VSTPlug-In for your Mac, please make sure that you first download and install the “Acqua_Host_Installer” available on our website:
Extract contents to the following location: (Primary HDD)Macintosh HD> Library> Frameworks>
You only need to download and place this Acqua Host Installer this one time for your Mac CDSoundMaster Acqua VST Plug-Ins.
To install “N-TEN-AT4”, first unzip the folder once downloaded.
Copy/Paste the CDSoundMaster-N-TEN-AT4 Folder to the following location:
HD>Library>Audio>Plug-Ins>VST> So that it looks like this:
HD>Library>Audio>Plug-Ins>VST>CDSoundMaster-N-TEN-AT4
Make sure that you have downloaded the “VSTAU_Manager” from our website:
Once you have ‘installed’ the N-TEN-AT4 plug-ins, you can open your AU host and open an instance of N-TEN-AT4.
When you first load any instance of the “N-TEN-AT4”, it will automatically generate a serial file for you. You only need to authorize your “N-TEN-AT4” program one time for the entire plug-in collection. The plug-Ins will not run until you complete the authorization process.
Go to your “CDSoundMaster-N-TEN-AT4” folder,
located at “HD>Library>Audio>Plug-Ins>VST>”. Within this folder you will see a file labeled “N-TEN-AT4.SER”. This is your unique serial file that has been generated. Email this serial file to Michael@CDSoundMaster.com
We will send your authorization file. Place this “N-TEN-AT4.AUT” file in the same folder as your “SER” file and reload the plug-Ins(s). Now they are authorized
and ready to work for you!
System
Requirements – Specifications Windows® VST : Windows® Sequencers and Editors
: Plug-In Format : Operating System : Authorization : Sample Rates : MAC VST :
Recommended minimum system is an AMD Dual Core with at least 1
gig ram running Windows 7, XP, Vista (32bit), and an audio interface
with sample rates from 44 kHz to 192 kHz. Preferred sample rate
is 96kHz with unrivaled internal conversion to other rates.
Sequencers and sound editors compatible with VST plug-ins. Most
major DAW’s have been tested and approved for compatibility.
– VST
– Windows 7 (32bit) (64bit)
– Windows XP (32bit) (64bit)
– Windows Vista (32bit) (64bit)
-Windows 7, XP, Vista (32bit) (64bit) – Serial File/Authorization File
– Up to 192 kHz sample rates supported
MAC with a VST or Audio Units Host, and an audio interface
with sample rates from 44 kHz to 192 kHz. Preferred sample rate
is 96kHz with unrivaled internal conversion to other rates.
Using "N-TEN-AT4 VST"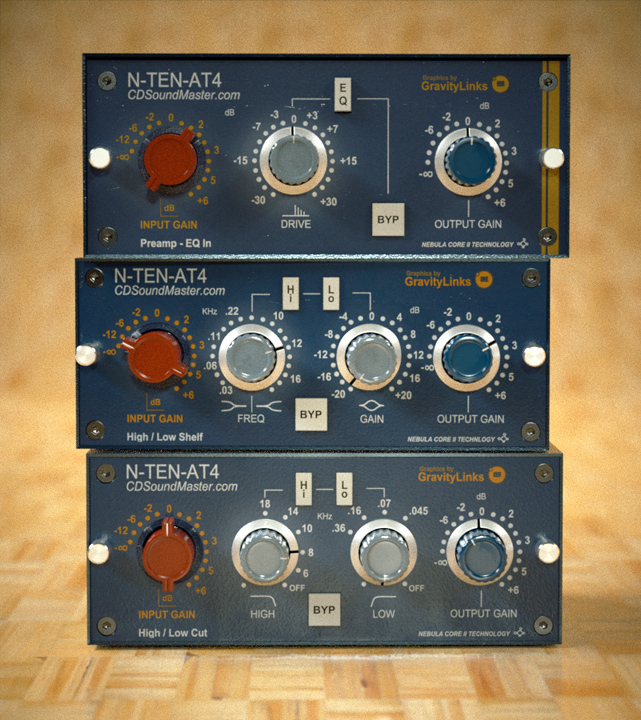
"N-TEN-AT4" is created at 96kHz with sound data all the way down to 0Hz and higher than 23000Hz! If you are working at 96kHz, the Plug-In will open the quickest, as it does not have to convert to a different rate.
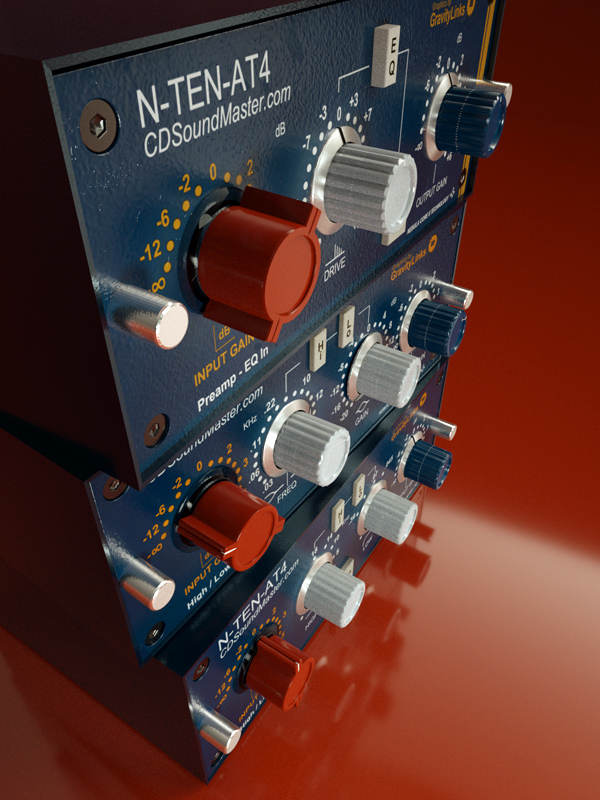
There are six plug-ins included in this collection. They are named as follows:
High/Low Cut
Narrow Bell EQ
Regular Bell EQ
Preamp – EQ In
Preamp – EQ Out
High/Low Shelf
To load these programs directly from your host according to their "dll" or plug-in name, use the following:
N-10-AT4-HL-CUT.DLL=
High/Low Cut
N-10-AT4-HQ.DLL = Narrow Bell EQ
N-10-AT4-NHQ.DLL = Regular Bell EQ
N-10-AT4-PRE-EQ-IN.DLL = Preamp – EQ In
N-10-AT4-PRE-EQ-OUT.DLL = Preamp – EQ Out
N-10-AT4-SHELF.DLL = High/Low Shelf

High/Low Cut
On the far left is the "Input Gain" knob. This knob controls the true analog nature of the complete signal path of the real vintage channel strip as it relates to gain change. This includes the input transformer, transistors, presence of the inductor eq in the signal path, and output transformers, as they affect the sound when turned down low or turned up high. Any subtle change to frequency, harmonic distortion, and dynamics from the actual circuitry are affected here in combination with any actual eq filter and gain changes from the eq circuit itself. This is special compared to many eq emulations that only simulate an example of the eq itself, in this plug-in you are experiencing all of the true non-linearities of the full channel strip. To increase the drive of the channel strip, increase the input gain and reduce the output gain to compensate and keep from going over. To use a slightly cleaner lower drive setting, simply reduce the input gain. In the High/Low Cut plug-in, there are 3 streaming kernels of harmonic distortion.
Next from the left we have the "High Cut" knob. When first loaded, the plug-in defaults to the "off" position for this knob. Turn it counter-clockwise to choose any of the high cut filters, starting from 6kHz to each consecutive positions or 8kHz, 10kHz, 14kHz, and 18kHz.
The second knob from the right is the "Low Cut" knob. This works the same as the "High Cut" to supply several low cut positions. When first loaded, this defaults to the "off" position. It can be used from 45Hz to 70Hz, 160Hz, to 360Hz.
Both high and low cut filters can be used independently of one another or both at the same time.
On the far right is the "Output Gain" knob. This control digitally sets the level of the output sent from the plug-in to the next part of the audio chain. This control does not affect the dynamic changes in the signal chain that take place in processing. Therefor, it is used to control variance in volume without affecting harmonics, dynamics, or eq.
The top, center of the plug-in contains two illuminated buttons designated by "Hi" and "Lo". This graphic is created purely for aesthetic purposes to signify the presence of the high and low cut controls.
In the bottom center of the plug-in is an active "Bypass" button. When illuminated, the plug-in is bypassed. When the light is off, the plug-in is active.
Narrow Bell EQ
On the far left is the "Input Gain" knob. This responds as described above.
Next from the left is the "FREQ" knob, which stands for frequency. This loads at the median eq frequency of 3.2kHz. Turn counter-clockwise to choose increasingly lower frequencies of 1.6kHz, 750Hz, and 350Hz. Turn clockwise to choose higher frequencies of 4.8kHz and 7.2kHz.
The narrow bell plug-in represents the narrow "Q" setting of the vintage eq. This is represented by the illuminated "HQ" or "high Q" light along with the bell-shape light in the top center of the plug-in. The next knob to the right is the "Gain" knob, which controls the volume range of the selected eq frequency, from -20dB to +20dB. The "Output" knob operates as described above. The "Bypass" button operates as described above.
The Narrow Bell EQ plug-in contains 7 streaming kernels of harmonic distortion.
Regular Bell EQ
All functions of the Regular Bell EQ operate the same as the Narrow Bell EQ mentioned above. The difference is that the "Q" shape is a wider width. This is indicated by the "HQ" button which is not illuminated in this plug-in setting.
Preamp – EQ In
The vintage console channel strip has a unique sound that is highly desired. The "Preamp – EQ In" plug-in is provided to use without multiple eq settings, just for the sound of running audio through this classic console with the eq engaged. Increase the input to get the effect of driving the transformers and other circuits into pleasant colorful harmonic distortion, or decrease the input to run the sound cleaner. 10 streaming kernels of distortion are sampled for the preamp programs. To increase the gain independently of the input gain, use the "Drive" knob. This increases the harmonic distortion and dynamics without changing the input level.
Preamp – EQ Out
This is the same as the settings mentioned above, except in this case the eq is turned off. In this instance, the signal is cleaner with a flatter frequency response with the eq circuit disengaged.
High/Low Shelf
All shelf frequencies for the N-TEN-AT4 are available on a single Frequency knob, starting from 30Hz, 60Hz, 110Hz, 220Hz, and up to 10kHz, 12kHz, and 16kHz. Shelf eq operates at a continued wide band starting at the frequency marked and contuing beyond that mark. For low shelf, the filter continues from the frequency downward, and for high shelf, it continues from the labeled frequency and above. This program contains 7 streaming kernels of harmonic distortion.
About The Technology

"N-TEN_AT4" is the result of an incredible amount of research, testing, and amazingly advanced technology. It may appear like just another Plug-In, but under the hood is a truly unequaled and complex system. The Acqua stand alone engine is based upon Acustica Audio’s V.V.K.T., or Vectorial Volterra Kernels Technology.
I truly hope that you enjoy N-TEN-AT4 VST Vintage Console Channel
Strip Plug-In Suite.
Thanks and God Bless You.
Sincerely,
Michael Angel
CDSoundMaster.com